Bread Yoga
Baguettes.
Posted
19 February 2023
Towards the end of a family summer meal for which I had prepared a tray of 3 baguettes, one of the guests (in their seventies) apparently was still hungry and while talking, ate an entire loaf of bread. Suddenly they said, "Damn, this bread is so good! Where did you buy it?" At that moment, I realized that my baguettes were finally good enough.
It is one of the breads that is worst treated by the bread industry. It has become the cheap bread for everyday use. Soft when you buy it, but rubbery in a few hours and hard as a rock in a day. In short: we pay for what we get.
But the truth is that a baguette can be very dignified and a truly delicious bread to accompany summer meals or to make memorable sandwiches. However, it must be made with care and dedication.
Kneading
To make baguettes, a special baking tray is essential. This will make them round and give their base the distinctive dotted texture. They could be made without it, but they would tend to be too flat, losing their appeal.
The first thing to do is to make a dough with sourdough starter, wheat flour, water, and salt. Nothing else. For this, I use a ratio of 70 grams of water per 100 grams of flour.
In my case, I use 500 grams of flour and 350 grams of water.
For kneading, as always, I put the water, sourdough, and flour in the kneading bowl. As I explained in the German rustic bread recipe, I use all the sourdough starter I have prepared, leaving the jar dirty to prepare the sourdough starter for the next time. This way, the sourdough starter will serve as an indicator of fermentation.
Knead the mixture and let it rest for five minutes, add the salt (in this case, 8 grams) and knead again until the consistency is optimal (not sticking to your hands).
First Fermentation
This dough should undergo a first fermentation of approximately 5 hours. We will regularly massage it by gently twisting the dough ball inward and underneath to allow it to capture some air. We can repeat this process approximately every hour, always with wet hands (without adding more flour).


Forming of the baguettes
Once we see that the sourdough has roughly doubled in size, it is time to stretch and fold the dough. With a dry work surface (the wheat dough is not at all sticky), we carefully stretch the dough until it forms a thin disk of approximately 50 centimeters in diameter (like a large pizza). It should be as thin as possible without tearing. Once we have done this, we fold it in thirds and then in half. Finally, we finish folding it to form a single piece (like a baguette but very long). Then we cut it into three segments as evenly as possible. At this point, we can sprinkle a little flour over the pieces and finish shaping them.
Now we are going to use the baguette baking tray. We cover it with a clean kitchen cloth and place the pieces of dough on each of the spaces on the tray. Once we have done this, we cover the tray with the tips of the cloth, if it covers the entire tray or we use another cloth to do so.
Second fermentation
Once the pieces are on the tray and covered, we put them in the fridge and leave them overnight. This time can be longer: it's okay if they are in the fridge for 24 hours, which will also allow us to better plan the time we want to bake them.
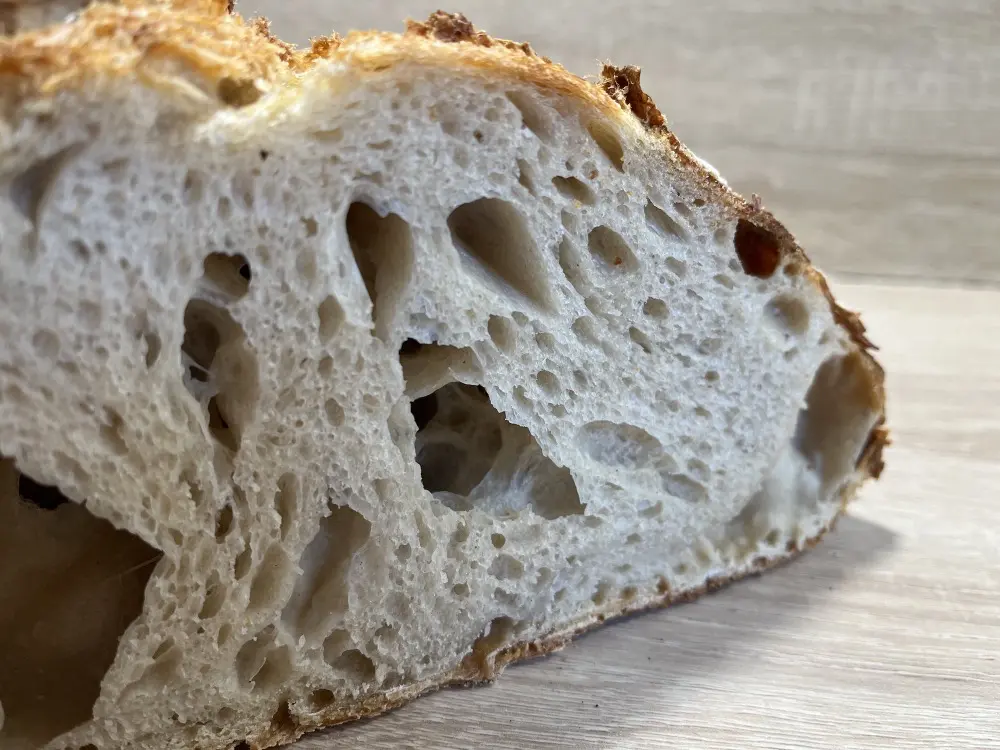
Between folding and the second low-temperature fermentation, our baguettes will be full of air, and when we bake them... well, you'll see what happens.


The backing
After a few hours have passed, our baguettes are ready for the most delicate part of the process: baking. To do this, we will carefully roll the pieces on the lower cloth so that they are directly on the baking tray. Once there, we will need to cut them carefully to give them the characteristic stripes. For this, we will use a razor blade and make the lines as long as possible. To help release the tension in the bars in the oven, it is preferable that they have only one longitudinal cut rather than many transverse ones. Personally, I only make three cuts per bar.
At the same time, we will preheat the oven to 200°C with top and bottom heat (not hot air!). For optimal baking and a perfect crust, we will need steam. To do this, we can heat an empty saucepan on the stove that does not have plastic handles, as we will later place it in the oven. At the same time, we will bring a liter of water to a boil in another saucepan.
When the oven is ready, we will place the baking tray with the baguettes on the middle rack and at the same time we will pour the boiling water into the heated saucepan. This will generate a large amount of steam, so we will carefully place the saucepan at the base of the oven. We close the oven and from that moment on, baking with steam will take place, which will make an excellent crust. This process will take 25 minutes.
After this time, we will carefully open the oven (with great care, as a lot of steam will come out) and remove the saucepan of water. We close the oven again and now we change it to hot air, also increasing the temperature to 240°C for another 20 or 25 minutes (until they are nicely browned).
Why these two phases? When we bake without air with top and bottom heat, we are giving heat to the bread by radiation, which will ensure that the inside is not raw. By doing the second part with air and without steam, we will have already ensured that the inside is well baked and we will make the crust crispy and also prevent the bars from sticking to the baking tray.


Chilled
In English: Once the second part of the baking is done, we can carefully take out the baguettes and let them cool for about an hour. If we have correctly done the second part of the baking, the baguettes will easily come off the baking tray.
Enjoy your meal!